


If you’ve ever uploaded a book to KDP, IngramSpark, Barnes & Noble Press, or Bookvault, you’ve already encountered the infamous cover template—that colorful PDF full of boxes, lines, descriptions, and warnings. For many authors, this is the moment the publishing process stops feeling creative and starts feeling technical—and overwhelming.
But cover templates aren’t meant to intimidate you. They’re designed to protect your book from printing errors, and once you understand how they work, they become one of the most empowering tools in self‑publishing.
What a Cover Template Actually Does
A cover template is a printer‑specific map showing exactly where your cover will be trimmed, where the spine will fold, and how much “wiggle room” the printer needs. It includes the complete cover—front, back, and spine—and it’s generated from four important details:
- Trim size (the final size of your book)
- Paper type (white, cream, groundwood, and the weight of the paper)
- Total page count (including all front matter and back matter—ALL the interior pages)
- Format (paperback or hardcover)
And within that template, one measurement matters more than most authors realize: the spine width.
The spine width is determined by two critical factors: the total page count and the type of paper chosen for the interior pages.
That “total page count” includes everything: title page, copyright page, dedication, acknowledgments, appendices, back‑of‑book extras, even blank pages added for layout symmetry (always an even number). If your formatted interior ends up at 312 pages instead of the 298 you estimated, your spine width will change. And when the spine width changes, the template changes.
Paper type matters too. For paperbacks, KDP offers white, cream, and groundwood. IngramSpark offers 50‑lb white, 70‑lb white, cream (spelled crème on their website), and groundwood.
Hardcover options are more specific. For example, KDP does not offer groundwood for hardcover books, and they only offer white if you choose premium color.
Each paper type has a different thickness, so the same page count yields different spine widths. A 300‑page book printed on white 50-lb paper will have a noticeably thinner spine than the same book printed on white 70-lb. That’s why you can’t “guess” the spine—you must use the correct paper type and final page count.
Change any one of these variables—even slightly—and the template changes too.
The Three Zones That Matter Most
Every template includes three critical areas, and understanding them is the key to stress‑free cover design:
- Bleed Area (where color/images go “off” the edges of the page) – Backgrounds and full‑bleed images must extend into this zone. If they don’t, you risk thin white edges after trimming.
- Trim Line – This is where the printer cuts the book. Anything sitting directly on this line is living dangerously.
- Safe Zone – All essential elements—title, subtitle, author name, logos, awards, and other critical design elements—must stay inside this area. Printers allow for slight shifts, and the safe zone exists to absorb those tiny movements.
Many authors assume that “if it looks centered on my screen, it will print centered.” In reality, printers have tolerances, and the safe zone is what keeps your design looking intentional even when the machinery shifts by a millimeter or two.
A Real Example: When Key Cover Elements Fall Outside the Safe Zone
When I first received the front cover for the SCAR Workbook and started compiling the cover template for the author, it was immediately obvious that important elements on the cover were falling in the DANGER ZONE—part of the K in Workbook and the right side of the aqua geometric design underneath it. In addition, the author name and title were off-center.
The “safe zone” in this example is indicated by the light green lines around the front cover.
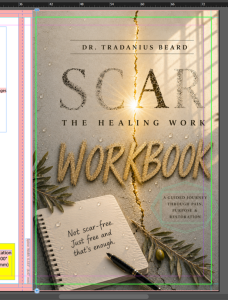
I recommended the following changes to the author: Shift the word Workbook left 0.125 inches; shift the author name and SCAR: The Healing Work about 0.25 inches left; and shift the geometric shape a full 0.25 inches left to bring it into the safe zone. These shifts pulled every element back into the safe zone, ensuring nothing would be clipped during printing.
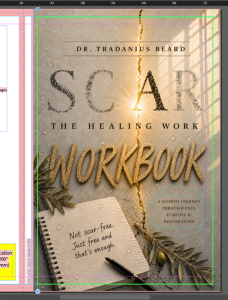
Once those adjustments were made, I was able to finalize the template and upload it for him.
[Used with permission by Dr. Tradanius Beard, author of SCAR and its accompanying workbook.]
This “before and after” is exactly why templates matter. They reveal issues you can’t see with the naked eye.
Why Every Platform Has Its Own Template
Even if two platforms offer the same trim size, their templates won’t match. Each printer uses different equipment, tolerances, and barcode placements. Amazon KDP’s spine formula differs from IngramSpark’s. Barnes & Noble Press positions the barcode differently than Bookvault.
Same book, same trim size, same cover design — different template. Below are examples of a template for a 6×9 paperback book with an internal page count of 444. The first is Amazon’s template; the second is IngramSpark’s.
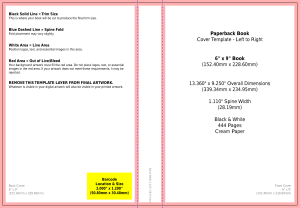
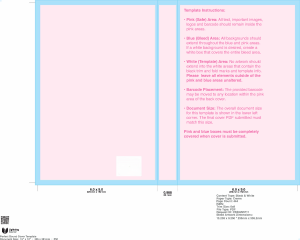
As you can see, Amazon KDP’s template is just the template, while IngramSpark’s version includes cropmarks and additional book details in the surrounding whitespace.
This is why reusing a template across platforms almost always leads to trouble.
How to Make Templates Work for You
Once you understand the zones and the purpose behind them, templates stop feeling like a hurdle and start feeling like a safety net.
- Download the template after your manuscript is fully formatted.
- Give the template to your designer before they begin the cover.
- Extend backgrounds fully into the bleed.
- Keep all essential elements inside the safe zone.
- Center spine text using the spine guides — not your eyeballs.
Follow these steps, and the upload process becomes smooth, predictable, and drama‑free.
The Bottom Line
Cover templates aren’t meant to confuse you. They’re meant to protect your book from printing errors and ensure your design looks exactly the way you intended. Once you understand how they work — and once you see how they can rescue a cover from accidental trimming — the whole process becomes far less intimidating.
Templates aren’t the enemy. They’re the guardrails that help your book look professional, polished, and ready for readers. Once you understand their pieces, cover templates stop being confusing and start becoming a tool you can rely on.
Ready for a Stress‑Free Cover?
If your cover designer doesn’t provide a full, print‑ready template — or if you’re trying to upload your book and suddenly realize you don’t have one — I can take that off your plate.
At BookLayoutPro.com, I don’t design the front cover. What I do is make sure your finished cover design actually fits the printer’s requirements by creating a complete, print-ready, platform‑specific cover template. In fact, I have done six different cover templates for one book in two different formats. I compiled paperback and hardcover templates for three different platforms.
You provide the finished front cover design as a high‑resolution PNG or JPEG—I’ll handle the technical precision that gets it accepted on the first try.
For more information on other cover essentials, click here.
A note about AI: AI tools assisted in developing this article. The ideas, recommendations, and final editorial decisions are my own.